- Click the "Start" button on the XP system tray, then > All Programs > Accessories > Systems Tools > System Restore. Choose this item on the list: Restore My Computer To An Earlier Time. Click "Next".
- On the dialog window, there is a calendar of the current month. Look for the highlighted days in the current month, those are days with a restoring point. Click a date, the restore points created on that day will appear on a list.
- Click the restore point on the list for that day, to which you want to return your system. Click "Next".
- A warning message will remind you to close all programs currently in use before proceeding. Click "OK" after you manually stop other programs running on your computer.
- For your confirmation, System Restore displays the time, date, and brief description of the restore point you chose for returning your system. If correct, click "Next".
- The restoration process will take several minutes, plus restarting Windows. You will see the System Restore reporting window, reporting the restoring status when Windows XP is running again.
- Click "OK" on the System Restore reporting window to finish task, if it says the restoration was successful. Your system is now restored to the previous point of your choice, and should be working faster.
Saturday, September 18, 2010
How to wipe a hard drive but not the operating sytem?
Monday, July 26, 2010
Troubleshooting plugins
Determining if a plugin is the problem
You can selectively disable plugins while Firefox is running. If you suspect a certain plugin, disable it first, then test for your problem. If you don't know which plugin to disable:
- Open the Add-ons Window by clicking the Tools menu and selecting Add-ons.
- In the Add-ons window, select the Plugins panel.
- Select a plugin in the list and then click its Disable button. Repeat this step for each plugin in the list. You do not need to restart Firefox for the changes to take effect.
- Test for your problem. If it does not occur, go back to the Add-ons window and re-enable plugins one-by-one with the Enable button until you find which one causes your problem to occur.
Manually uninstalling a plugin
If you can't use an uninstaller program to remove a plugin, you can remove it manually:
- In the Location bar, type about:config and press EnterReturn.
- The about:config "This might void your warranty!" warning page may appear. Click I'll be careful, I promise!, to continue to the about:config page.
- Search for the preference: plugin.expose_full_path.
- Double-click on the plugin.expose_full_path preference in the list to change the value to true.
- Enter about:plugins into the Location bar to display the About Plugins page.
- Each entry in the About Plugins page will have "File name:" followed by a path. Use Windows Explorer to navigateNavigate to the folder shown for the plugin you want to remove.
- Rename the file to something other than its normal name - e.g. npswf32 becomes Xnpswf32
The plugin will be removed.
Re-initializing the plugins database
In some cases, you may not be able to install or re-install a plugin. Re-initializing the plugins database may fix this problem:
- Open your profile folder:
- (Firefox 3.0 and 3.5):
- (Firefox 3.6): At the top of the Firefox windowOn the menu bar, click on the Help menu and select Troubleshooting Information.... The Troubleshooting Information tab will open.
- Under Application Basics, click on Open Containing FolderShow in Finder.
- From the menu at the top of the Firefox windowbar, select FileFirefox and then select the ExitQuit FirefoxQuit menu item.
- Delete the pluginreg.dat file.
- Open Firefox
- In the Location bar type about:plugins and press EnterReturn to bring up the Firefox plugins list.
Tuesday, July 20, 2010
Fix 500 Internal Server Error
- "500: Internal Server Error"
- "HTTP Error 500 - Internal Server Error"
- "500 Error"
Friday, July 16, 2010
Configuring Windows 7 Firewall
To see if you're running Windows Firewall:
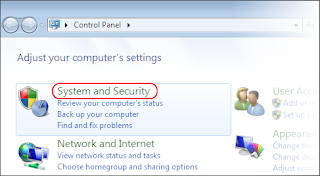
- Click the Windows icon, and select Control Panel. The Control Panel window will appear.
- Click on System and Security. The System and Security Panel will appear.
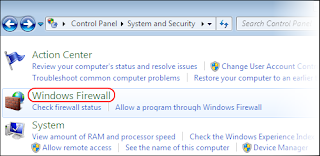
- Click on Windows Firewall. The Windows Firewall panel will appear.
- If you see a green check mark, you are running Windows Firewall.
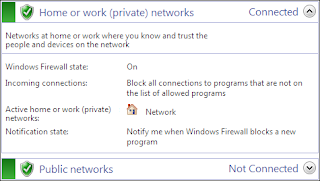
Configuring Windows 7 Firewall
If you're running Windows Firewall and having connection problems in Firefox:
- On the left side of the Windows Firewall panel, click the Allow a program or feature through Windows Firewall. The Allowed Programs panel will appear.
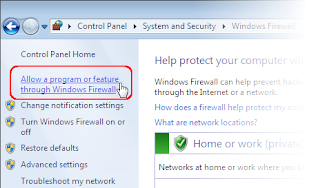
- Click the Change Settings button.
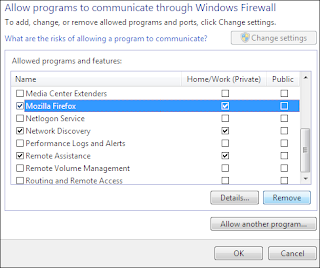
- Find Mozilla Firefox in the list of programs. If it is there, click to select it. If not, skip the next step.
- With Mozilla Firefox (or firefox.exe) selected, click the Remove button. Confirm that you want to remove the entry.
- After removing the Mozilla Firefox entry, click the Allow another program... button. The Add a Program window will appear.
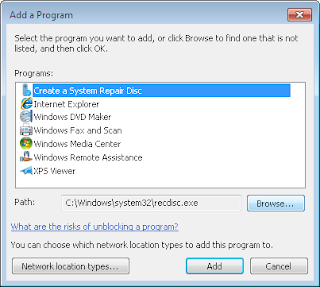
- In the Add a Program window, click the Browse... button.
- Navigate to the Firefox program directory (e.g. C:\Program Files\Mozilla Firefox\) and double-click on firefox.exe.
- Click the Add button.
- Click the OK button to close the Allowed Programs panel.
Thursday, June 24, 2010
Internet Explorer speed up
The web is a sparkling achievement of modern society. It's everywhere—from the home to the classroom. We use it to communicate, to work, to play—even to waste time, when there's not a lot to do.
Yet there's nothing more frustrating than having this technical marvel at our fingertips 24 hours a day, 7 days a week, only to wait as our computers access the Internet at a crawling pace. Thankfully, Windows Internet Explorer provides some useful options for quicker web surfing. Let's look at these options now.
Reduce the size of your webpage history
Internet Explorer stores visited webpages to your computer, organizing them within a page history by day. Although it's useful to keep a couple days of web history within your computer, there's no need to store more than a week's worth. Any more than that and you're collecting webpages that will slow down your computer's performance.
To reduce your webpage history:
In Internet Explorer, on the Tools menu, click Internet Options.
In the General tab, under Browsing history, click Settings.
Under History, find the Days to keep pages in history: box. In the box, type 1. Click OK.
Reduce the number of days to keep pages in history.
Days to keep pages in browser history.
Don't save encrypted webpages
Encrypted webpages ask for usernames and passwords. These pages scramble information to prevent the reading of this sensitive information. You can define Internet Explorer to not save these types of pages. You'll free up space by saving fewer files to your computer, in addition to keeping secure information off of your computer.
To not save encrypted webpages:
In Internet Explorer, on the Tools menu, click Internet Options.
In the Internet Options dialog box, click the Advanced tab.
In the Settings section, scroll down to the Security section. Select the Do not save encrypted pages to disk option, check box, as shown here. Click OK.
The selected Do not save encrypted pages check box
Monday, June 21, 2010
How to Speed Up Mozilla Firefox ?
So, you’ve turned on your computer, clicked on Mozilla Firefox, and then….you waited. “Why,” you say, “Is firefox slower now?”
Well, we’re here to fix that problem! Whether it’s just because you want to make Firefox faster than it already is (which is wickedly fast anyway), or because you want to fix your declining speed, you’ve come to the right place.
Please note that if you do not have firefox as your default browser, I advise you to get it immediately. It is faster and more efficient than every browser out there. It is obtainable at mozilla.org/firefox.
If you use all the methods put together, you should be able to see a speed increase of at least 50% on Firefox.
Method 1:
Okay, well. To begin with, I will tell you how to increase your bandwidth speed by 20%.
Windows actually reserves 20% of your bandwidth for purposes I will never know. I’ll show you in a few easy steps, how to reclaim it.
Step 1:
Click “Start“, and go on “Run“, and type in “gpedit.msc“. You should see this:
Step 3: Double-Click on “Computer Configuration”.
Step 4: Double-Click on “Administrative Templates”
Step 5: Double-Click on “Network”
Step 6: Double-Click on “QOS Packet Scheduler”
Step 7: Double-Click on “Limit Reservable Bandwidth”
Step 8: Check the box that says ‘Enabled’ and change Bandwidth Limit (%) to 0.
You got 20% increase on your bandwidth speed! Easy, was it not?
Method 2:
The next way is to modify the amount of requests can accept at once. By changing it to a very high number (30+), you should see a massive rise in speed.
So, to this, I’ll put it in a few easy to follow steps.
Step 1: Load up Mozilla Firefox. Now, in the address bar, type “about:config” (Without the ” ” of course). You should see this:
Step 2: Scroll down the page until you find browser.tabs.showSingleWindowModePrefs, and then double-click it. This will set it to “True”.
Step 3: Next, scroll down look for the line that says network.http.pipelining, and double-click this. This will set this to “True”.
Step 4: Now, scroll down and look for network.http.pipelining.maxrequests. Once you have done this, double-click it, and a box will pop up. Change the number to 60.
Close Firefox. You will now experience a 10% to 40% increase in speed.
source:-http://www.online-tech-tips.com/computer-tips/speed-up-mozilla-firefox/
Monday, June 14, 2010
How to Disable Browser Cache ?
Internet Explorer
- from a menu select "Tools"
- select "Internet Options"
- in "Temporary Internet Files" section click on "Settings"
- select "Every visit to the page" for "Check for newer versions of stored pages"
- save the settings
Netscape Navigator
- select "Edit" from the menu bar
- select "Preferences"
- from "Category" tree expand "Advanced"
- click on "cache"
- select radio button "Every Time" for "Document in cache is ..."
- save the settings
Thursday, June 10, 2010
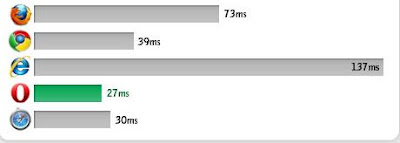
Performance Comparison Of Web Browser


source:-

Wednesday, June 9, 2010
How To Restoring A Hijacked Browser ?
Monday, June 7, 2010
There are many reasons that Internet Explorer could be encountering this issue. Some examples are connectivity to your ISP, a firewall blocking your connection, or your networking device not functioning properly. Here are some things that you can try:
Method 1: Run the Network Diagnostics tool in Internet Explorer:-
1. Start Internet Explorer, and then try to access the Web page that is displaying the error message.
2. On the page that displays an Internet Explorer error message, click the Diagnose Connection Problems link. The Network Diagnostics tool will run. When the tool has finished running, it will report one of the following results:
It was unable to find a problem.
It has detected a problem. Additionally, the tool will provide guidance about the next steps to take to troubleshoot the problem.
3. Click IP Address, and note the IP Address. You may need it for future troubleshooting.
4. Follow the steps in the Network Diagnostics tool to fix any connection problems.
5. Start Internet Explorer.
If you receive the same error message, go to the next method.
Method 2: Reset the modem or the router:-
1. Disconnect the cable that connects the computer to the modem.
2. Turn off the modem and the router.
Note: If the modem or the router does not have a power switch, disconnect the power to the modem or to the router.
3. Restart the computer.
4. After your computer has restarted, turn on the modem or the router, connect the cable from the computer to the modem or the router, and restart the computer.
5. Make sure that all network cables are securely connected.
6. Start Internet Explorer.
If you receive the same error message, go to the next method.
Method 3: Use the Delete Browsing History feature:-
If resetting the modem or the router did not resolve the problem, deleting your browsing history might help. Follow these steps to remove your temporary Internet files, history, and form data:
1. Start Internet Explorer.
2. Click the Safety button, and then click Delete Browsing History.
3. Select the check box next to each category of information you want to delete.
4. Select the Preserve Favorites website data check box if you do not want to delete the cookies and files associated with websites in your Favorites list.
5. Click Delete. (This could take awhile if you have a lot of files and history.)
6. Close Internet Explorer, start Internet Explorer again, and then try to access the Web page.
If you receive the same error message, go to the next method.
Method 4: Use the Internet Explorer (No Add-ons) mode :-
1. To do this, click Start, point to All Programs, point to Accessories, point to System Tools, and then click Internet Explorer (No Add-ons).
If this resolves the issue, follow these steps to isolate the browser add-on that is causing the issue:
Click Tools, and then click Internet Options.
Click the Programs tab, and then click Manage add-ons.
Click an add-on in the Name list, and then click Disable.
Repeat step 3 until you identify the add-on that is causing the issue.
If the methods above did not resolve your issue, you can try advanced troubleshooting methods. For advanced troubleshooting, see You receive an error message in Internet Explorer: "Internet Explorer cannot display the webpage". (http://support.microsoft.com/kb/956196)
Tuesday, May 25, 2010
How to Enable JavaScript in Internet Explorer ?
Friday, May 21, 2010
How To Block Website With Password ?
Step 1
Click Start > Control Panel > Internet Options.
Step 2
Click the "Content" tab on the top toolbar and select "Parental Controls." Click "Create a New User Account." To set parental controls and block web content, you must create a new user account.
Step 3
Enter the new account name and click "Create an Account." If you are creating an account for a child, enter her name.
Step 4
Select "On, Enforce Current Settings" under the Parental Controls option. Click "Block Some Websites or Content." Click "Windows Vista Web Filter."
Step 5
Click the "Edit the Allow and Block List" link. Enter the website address into the space bar and click "Block." Click "OK" to close.
Step 6
Restart the computer. Click the new user name icon and set the password at the log on screen. A password will now be required to access the specific websites that are blocked.
source:-ehow.com
Thursday, May 20, 2010
How to Enable Cookies in Internet Explorer 8 ?
You will not be able to complete a purchase, or take advantage of certain features if your web browser is set to refuse cookies from our website.
Here are basic instructions for adjusting your browser to allow cookies. If the browser you use is not listed, please consult your documentation or online help files within your browser window.
If you are unsure of what browser version you have then open your browser, click on help, and click the "About" option.
Steps To Enable Cookies Internet Explorer 8.x
1. Click on the Tools-menu.
2. Select Internet Options in the menu - a new window opens.
3. Click on the Privacy tab near the top of the window.
4. Click on the Default button of the window.
5. Move the slider so that it is on one of the levels below Medium High (including Medium, Low, Accept All Cookies).
6. Save changes by clicking OK.
7. You should be able to add items to your shopping cart now.
source:-http://www.beltal.com/help/en/enablecookies.html
Fix Script Errors In Internet Explorer
Method 1: Disable script debugging
If the only sign of a problem is the error message, and Web sites are working, you can probably ignore the error. Also, if the problem only happens on one or two Web pages, it might be a problem with those pages. If you decide to ignore the errors, you can disable script debugging.
Note If this problem occurs on more than one or two sites, do not disable script debugging. Go to method 2 now.
To turn off the Scripting Debugger in Internet Explorer 6, follow these steps:
1. On the Tools menu, click Internet Options.
2. On the Advanced tab, click to select the Disable script debugging check box. and then click OK .
To turn off notification about every script error in Internet Explorer 7, follow these steps:
1. On the Tools menu, click Internet Options.
2. On the Advanced tab, click to clear the Display a notification about every script error check box, and then click OK.
Method 2: Test a Web page from another user account, another browser, and another computer:-
Use another user account, another browser, or another computer to view the Web pages that triggered a script error to determine whether the problem persists. If the script error persists, there may be a problem with the way the Web page is written. You can probably ignore the error and disable script debugging as described in method 1.
If the script error does not occur when you view the Web page from another user account, browser, or computer, the problem may be caused by files or by settings on your computer. Go to method 3 to continue to troubleshoot.
Method 3: Verify that Active Scripting, ActiveX, and Java are not being blocked by Internet Explorer:-
Active scripting, ActiveX, and Java are all involved in shaping the way information displays on a Web page. If these are blocked on your computer, it may disrupt the display of the Web page. Reset the Internet Explorer security settings to make sure these are not blocked. To do this, follow these steps:
1. Start Internet Explorer.
2. On the Tools menu, click Internet Options.
3. In the Internet Options dialog box, click the Security tab.
4. Click Default Level.
5. Click OK.
Note ActiveX controls and Java programs are turned off at the High security level in Internet Explorer.
Try to open a Web page where you previously received a scripting error. If you do not receive the error, the issue is resolved. If the issue persists, go to Method 4.
Method 4: Remove all the temporary Internet-related files
Every time that you open a browser to view a Web page, your computer stores a local copy of that Web page in a temporary file. If the size of the temporary Internet files folder becomes too large, some display problems may occur when you open Web pages. Periodically clearing the folder might help resolve the issue.
To remove all the temporary Internet-related files from your computer when you use Internet Explorer 6, follow these steps:
1. Start Internet Explorer.
2. On the Tools menu, click Internet Options.
3. Click the General tab.
4. Under Temporary Internet files, click Settings.
5. Click Delete Files, and then click OK.
6. Click Delete Cookies, and then click OK.
7. Under History, click Clear History, and then click Yes.
8. Click OK.
To remove all the temporary Internet-related files from your computer when you use Internet Explorer 7, follow these steps:
1. Start Internet Explorer.
2. On the Tools menu, click Internet Options.
3. Click the General tab.
4. Under Browsing History, click Delete, and when you are prompted, click Yes to confirm.
5. In the Delete Browsing History dialog box, under Temporary Internet Files, click Delete Files, and when you are prompted, click Yes to confirm.
6. Under Cookies, click Delete Cookies, and when you are prompted, click Yes to confirm.
7. Under History, click Delete History, and when you are prompted, click Yes to confirm.
8. Click Close, and then click OK to close the Internet Options dialog box.
source:-http://support.microsoft.com/kb/308260
Sunday, May 9, 2010
Top 5 Internet Explorer issues:-
Issues viewing Web pages
i) "Page cannot be displayed" errors
ii) Red x instead of pictures
iii) View, Source doesn't work
To address the issues above, you may need to try one, some, or all of the following three procedures.
Empty the cache
The first thing to do when Internet Explorer is misbehaving is empty your Internet Explorer cache. Often the cache is not corrupt or damaged – it is simply too large.
1. Click Tools, then Internet Options, and then click the Delete Files button.
2. A Delete Files window will appear. Select the option to Delete all offline content, and then click OK.
3. Click Settings and reduce the size of your cache to, say, 50 to 100 MB (more if you routinely download very large files).
This will invariably fix the dreaded red x, View, Source, and sometimes "Page cannot be displayed" errors.
 Troubleshooting fix number 1—empty your IE cache.
Emptying the cache will not be sufficient to fix things if a hidden file in the cache folders, called index.dat, is corrupt. Our best alternative in such a situation is to delete the cache folders in their entirety, but this cannot be done from within Windows under normal circumstances.
Index.dat is a system file, and any attempt to delete it while Windows is running or while the user is logged on will be blocked. Therefore, we need to reboot into DOS mode or, when running later versions of Windows that support user accounts, we need to log in to Windows using a different Administrator account to that which is affected.
Note: The following procedure is for advanced users.
If you are running Windows 95, Windows 98, or Windows Millennium Edition (Me)
1. Click on Start, then Shut Down, and select the Restart the Computer in MS-DOS mode option. (If you are running Windows Me use a Windows 98 startup disc to access DOS mode.)
The steps required to create a startup disk are the same for Windows 95, Windows 98, and Windows Me.
1. Click on Start, point to Settings, and then click on Control Panel.
2. Open Add/Remove Programs, click on the Startup Disk tab, and then click Create Disk and follow the prompts. Make sure you have an empty floppy disk ready.
If you have difficulties when using Add/Remove Programs to create a startup disk (for example, if the Wizard prompts for your operating system installation disk and you cannot find it, or you only have a manufacturer provided restore disk or partition) go to www.bootdisk.com/bootdisk.htm. Download a Windows98 boot disk executable file from that site, put an empty floppy disk in the correct disk drive, and then double click on the downloaded file to make the disk. I recommend Windows 98 SE Custom, which includes smartdrv.
Turn your PC off, and place the startup disk in the computer’s floppy drive. Turn on your PC, which should read the startup disk and load the DOS operating system instead of Windows.
Once the system has finished booting into DOS mode, run the following commands from the Windows directory, typically displayed in DOS as c:\windows\>.
smartdrv
deltree tempor~1
Just to be sure, let's also run:
deltree history
deltree cookies
I should explain what tempor~1 means. The version of DOS that is included on the Windows 98 startup disk does not support long file or folder names like "temporary internet files." We are restricted to 8 letters only. Therefore, any file or folder which has more than eight letters to its name must shortened, and appended with ~1 when use the Windows 98 version of DOS.
If you are running Windows 2000 or Windows XP
We do things differently when working with operating systems that support User Accounts, such as Windows 2000 and Windows XP. Firstly, Windows 98 boot disks do not work if a hard drive is formatted as NTFS instead of FAT . Secondly, Windows 2000 and Windows XP use a more complicated directory structure than Windows 95 and Windows 98, making DOS more difficult to use successfully.
The path to the Internet Explorer cache directory will typically be something similar to:
C:\Documents and Settings\username\Local Settings\Temporary Internet Files\...
Thankfully, Windows 2000 and Windows XP users can log in using an Administrator account to delete the folders in question directly from within Windows Explorer. Note that an Administrator cannot delete his own Internet Explorer cache folders. He must log on using a different Administrator account.
Edit the HOST file
Note: The following procedure is for advanced users.
The HOSTS file is a hidden file used by some Internet related programs to control Web browsing by directly linking particular Web sites to pre-set IP addresses. The only problem is, if a Web page's IP address changes, the HOSTS file will not update itself to suit, causing "Page cannot be displayed" errors.
The HOSTS file can be viewed and edited using Notepad, but first we must temporarily show hidden files.
For Windows XP
1. Click Start, and then click Control Panel.
2. Click Appearance and Themes, and then click Folder Options.
For older systems
1. Double-click My Computer, click View, and then click Folder Options.
2. On the View tab, under Hidden files and folders, click Show hidden files and folders, and then clear the Hide protected operating system files check box.
Find and edit your HOSTS file
The correct directory for a HOSTS file depends on what version of Windows you are running:
Windows XP = C:\Windows\System32\Drivers\Etc
Windows 2K = C:\Winnt\System32\Drivers\Etc
Win 98\ME = C:\Windows
Once you have found your HOSTS file, right-click on the HOSTS file, and then select Open. You will be asked to choose a program to use. Select Notepad, but make sure you that you do NOT turn on any option to always use the same program.
Examine the content of your HOSTS file, and compare it to the screenshot below. We do not need to worry about any line that begins with an # because is ignored by Windows. Also, the line "127.0.0.1 localhost" can be safely ignored, because it is a standard entry.

A HOSTS file can be used to control Web page to IP address associations
Anything else that appears in your HOSTS file without an # at the beginning, apart from the "127.0.0.1 localhost" line, should be viewed with suspicion when we are trying to diagnose the cause of "Page cannot be displayed" errors. The quickest way to test for HOSTS file involvement is to right click the HOSTS file, then select Rename. Add the letter X to the beginning or end of the file name and then ok your changes. By changing the name of the HOSTS file, we stop Internet Explorer from using it, and therefore resolve any issues caused by the file.
Repair Layered Service Provider problems
Sometimes Internet Explorer is unable to access the Internet if software known as Layered Service Provider (LSP) has been removed incorrectly from a computer. You might not know you have this software; it is sometimes installed by unrelated software such as file-sharing programs, without your knowledge. In such cases, you will need to run LSPfix or Winsockxpfix. As its name suggests, Winsockxpfix should only be used on machines running Windows XP. LSPfix can be used on all other consumer versions of Windows, but make sure that Winsock 2 has been installed on Windows 95 machines.
Issues related to default browser settings
iv) Error messages when attempting to send a page or link by e-mail
First, reset your default e-mail client from within Internet Explorer. To do this go to Tools, then Internet Options, then Programs, then select your e-mail program of choice.

The easiest way to set your default e-mail client is from within Internet Explorer
Sometimes your e-mail program will not appear in the drop down list shown above. When this happens, we need to re-register the program in question.
To re-register your e-mail program:
1. Click Start, then click Run, and then type the appropriate command based on the following e-mail programs:
Outlook Express:
"C:\Program Files\Outlook Express\Msimn.Exe" /reg
Outlook:
"c:\program files\microsoft office\office\outlook.exe" /checkclient
Make sure the path to msimn.exe or outlook.exe is correct for your machine. Type the command line exactly as it appears, including quote marks and spaces.
If using a non-Microsoft e-mail program:
A program must be Internet Explorer aware to automatically list itself as a default program option. If the program does not appear, there are a couple of things you can do. First, you can right-click the executable file for the program, and see if Register appears as an option, (which should cause the program to be listed on the drop box on the Program Tab)
Otherwise, there's a manual method, but it involves editing the registry and adding the program under:
HKEY LOCAL MACHINE\Software\Clients\mail
-or-
HKEY LOCAL MACHINE\Software\Clients\news
You will need to contact your program's vendor for the appropriate syntax.
V) Internet Explorer freezes, shuts down without warning, or the computer reboots.
This problem is often caused by out-of-date video drivers. Go to the Web site run by the manufacturer of your video card and download, then install, the latest (non-beta) drivers for your video card.
Alternatively, you can try the following:
1. Click Start, and then click Control Panel.
2. Click Display (in classic view of Windows XP), click the Settings tab, and then click Advanced.
3. Click the Performance or Troubleshooting tab (depending on your operating system), and then reduce hardware acceleration a notch at a time until your system stabilizes.
source:- http://www.microsoft.com/windows/ie/community/columns/ietopten.mspx#top
Friday, April 2, 2010
Computer Support Services
Computer support services assist you in resolving your issues related to computer software and hardware. If you are in search of a best computer service provider, then contact iYogi Technical Services, which offers best solution of technical issues.
Why pick and choose iYogi ?
There are many reasons for selecting iYogi as your computer service provider; some of them are enlisted here:
• Remote PC repair through Internet
• Speedy online computer diagnostic and repair for one low price
• Instant access to Microsoft Certified technicians
• A faster, stronger, healthier PC without going anywhere
iYogi can help you in resolving a range of computer problems. It offers computer support services from simple start-up errors and device conflicts to blue screen errors and system freezing. You do not have to concern about how to resolve your problems, just contact iYogi and get your issues resolved. Its technicians will optimize your PC, so that, you can enjoy a faster computer system.
iYogi’s services encloses a comprehensive analysis of the problem with a complete solution, including:
• Repairing any operating system issues
• Making sure your computer is running fast and well
• Finding the source of crashes, lockups, unusual slowness, or Internet problems
• Installing critical updates, if necessary
iYogi has Microsoft Certified Technicians standing by to help you with your computer problems. It provides full support to resolve technical issues at an affordable price. iYogi offer desktop and laptop technical support for many software applications and hardware including peripherals like printers, scanners, etc.
Thursday, March 25, 2010
Dial iYogi’s toll free number to access 24/7 online computer repair services.
Tuesday, March 16, 2010
What is Trojan horse?

Sometimes, a Trojan horse hides itself as a folder while in fact, it's a .EXE file. This is to catch the eye of users so they will click and execute it.
Different kinds of Trojan horse are OSX.RSPlug Trojan of Mac operating system, Trojan horse downloader, Trojan horse Generic 9, Trojan horse downloader Adload, Trojan horse generic 6, Trojan horse spyware and Trojan horse Vundo.
After the user executes the file, it will open an alternative means for malicious software such as spyware and adware to infect your PC. After the execution of file the keyloggers will enter from back doors and will pollute files and folders. Keylogger is an explicit software code that has capability of calculating the keyboard stroke, such as username and password for misuse purpose.
Trojan horse infection comes from downloading the program themselves or its being downloaded into their system stealthily. For example, you are looking for some paid program on Google that converts into video format.
Trojan horse is a rouge application code that shut downs the performance of PC. Some of the hazardous affects of Trojan horse are-
• Repeated system reboot
• Slow work efficiency of system
• Uncertain system crash
• Unexpected termination of application programs
• Delay’s in program opening and close
• Sound disabilities in speakers
Trojan horse is a system deadly application code and has to be removed to prevent unnecessary changes in system performance. Consider the steps for removal of Trojan horse-
STEP 1: Disable System Restore feature on your PC. System Restore, if enabled will restore all deleted files containing Trojan horse. Go to “My computers”, click on performance and select File system and then, Disable System Restore.
STEP 2: Reboot your PC in safe mode by persistently pressing the F8 key.
STEP 3: Go to start, click on “Control panel” and then, click on ADD\REMOVE Programs. It will show you list of programs containing Spyware and adware. Select the Remove program option.
STEP 4: In Windows System Folder delete all the files that contains Trojan virus extension.
Trojan horse is an explicit source code that alters the efficiency of PC. To prevent your system from getting affected with Trojan horse install antivirus security program such as McAfee Premium.
Monday, March 15, 2010
How to Installing Windows OS ?
Some of the features of Windows 7 operating system are-
• Home Group: Reduces effort of sharing files and folders and takes printer on home network
• Snap: Provides an efficient way to resize and compare windows on your desktop PC
• Windows Search and Taskbar: Provides you with quick search technology and improved thumbnail previews, easier-to-see icons, and more ways to customize.
• Windows Lice Essentials: Provides you with multiple programs, such as free download, movie makers and photo gallery.
Microsoft offers you different versions of Windows from lower version Windows XP to higher Windows 7. In order to install windows operating system on your desktop you, need to fulfill the minimum hardware requirements.
To install windows 7 operating system, your system should have -
• 1 gigahertz (GHz) or faster 32-bit (x86) or 64-bit (x64) processor
• 1 gigabyte (GB) RAM (32-bit) or 2 GB RAM (64-bit)
• 16 GB available hard disk space (32-bit) or 20 GB (64-bit)
• DirectX 9 graphics device with WDDM 1.0 or higher driver
To install windows 7 operating system on your computer, follow the steps mentioned below-
STEP1: Boot your system so that Windows starts normally, insert the Windows 7 installation disk into your hard drive and shut down your system.
STEP2: Reboot your PC and press any key you wish when prompted and then follow the directions.
STEP3: Go through all the license terms and conditions, if you accept the license terms, click “I accept” and then click “Next”.
STEP4: It will ask you that “Which type of installation do you want”, click “custom”.
STEP5: You will be prompted to “Where do you want to install windows”, click drive options.
STEP6: Click the partition that you want to change, click the formatting option that you want to perform and then follow the instructions.
STEP7: When you are finished with formatting, click “Next” option.
STEP8: Follow the instructions to finish the windows 7 installation and finally click on “Finish” option and then reboot you PC.
After considering the above listed steps, Windows 7 will get installed at your system and you can enjoy the advantage of its features.
Friday, March 12, 2010
Help with Microsoft Word
Microsoft Word is a word processor developed by Microsoft. It is one of the most commonly used word processing programs used in creating thesis, articles or letters. It is a part of Office 2000, 2003, 2007 and its first version was released in 1983 under the name Multi-Tool Word, which was developed for Xenix systems. The Microsoft Office 2003 Help tutorial teaches Microsoft Word 2003 basics. This tutorial is created for the computer beginner as Microsoft Word 2003 is little different from its predecessors.
Microsoft Word is a very powerful word processing application, but some of its features are difficult to learn and would take even the most skillful PC user long time to learn all its features. Therefore, I have put together some few quick tips to help you improve your MS Word skills.
Following are some tips, which may help you with Microsoft Word:
• Before editing the Word documents, you must save a copy to your computer or a removable disk. To download a Word document from Internet to your computer, right click on the link and select “Save Target As or Save As”.
• If the form is locked, then it means that you can only type in the specified fields. Any form field in which you may enter information should show on your screen in gray color.
• The form fields may be in text boxes or check boxes. You can reply to a text box by inserting your cursor into the gray box and type. To select a check box option, you need to click in the box or press the space bar on your keyboard.
• Use your mouse, the arrow keys or the TAB key to move between fields.
• You must save the final versions after completing the form. After that, you can attach the form to an e-mail and send it to the specific e-mail address.
• You can type your response in the field for those questions that require detailed responses. The length of your response is unlimited and the text box will grow as you type.
These authenticated Microsoft Word support tips should enable any user to use Microsoft Word with ease.
Wednesday, March 10, 2010
Best Troubleshooting Tips For HP Products
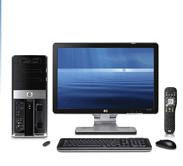
HP has introduced innovation in mobile computing; there are some ultraportable models like Compaq Mini CQ10 series, Compaq Presario CQ61Z series and HP Pavilion dm3z series which are quite popular.
However, sometime you may face issues with your HP computer, when you need to implement the best troubleshooting technique. Some of the most random issues of HP computers are slow performance, blue-screen error, audio problems and low memory. On rare occasions, you may also face problems with installation of software and hardware devices on your HP computer.
You can follow some easy troubleshooting steps to enhance your computer’s performance and reduce the chances of blue-screen error. Mainly, these occur due to lack of memory. There are free utilities like Disk Cleanup and Defragmenter, which can delete unwanted files and generate extra space on your computer’s memory at no cost.
However, memory of your HP computer can also be flooded with some virus infected files. In this situation you can troubleshoot your HP computer by scanning with compatible antivirus software, such as Avast Free Antivirus, AVG Anti-Virus 9.0 and Norton Internet Security 2010.
At times, your operating system might also get corrupted.
Follow the below troubleshooting steps to rectify/repair you corrupted Windows 7 OS:
Step 1. Insert a valid Windows 7 CD into the DVD drive and restart your computer.
Step 2. Change the boot order through BIOS, if required.
Step 3. Select the language you prefer and mention “Time” and “keyboard input”. Click “Next”.
Step 4. You will be getting three options, select “Repair Your Computer” followed by “Command Prompt” to run the effectual utility tool called "bootsect.exe". It will repair your Windows 7 operating system.
To get real-time resolution for any issues related to your HP product, you can always contact some tech support organization. These organizations have a team of experts and proper technology, which make them capable of resolving any issue related to HP product with an ease.

